One of the easiest maintenance tasks that even a complete mechanical novice can perform on their own vehicle is to replace your own air filters. Taking on this task on your own is an easy way to save some money while keeping you car in top form. Typically in a car there are two main types of air filters: the engine air filter and the cabin air filter. These filters are not expensive parts and can be sourced from your local auto parts store or an online retailer like Amazon. Installation is generally quite simple, usually requiring only standard tools and the jobs can take as little as 5 to 30 minutes.
Engine Air Filter vs. Cabin Air Filter
Your engine air filter is in place to make sure that dust, dirt, sand, pollen, bugs, moisture or anything else that might be flying through the air does not get sucked inside your engine while it is running. Even a tiny bit of debris sneaking inside your car’s engine can have significant repercussions and cause internal engine damage. Over time (the amount of time varies depending on the atmospheric conditions you have driven through), your engine air filter will start to become dirty and clogged. When air is not able to efficiently flow through the filter, your engine’s performance will suffer and could result in decreased MPG, slower acceleration, diminished power output, engine misfires, smoke from your exhaust and check engine lights. Engine air filters are intended to be changed periodically at regular service intervals, however if you know you’ve just driven behind another vehicle on a dusty road, through heavy smoke and ash from a forest fire, or have just been playing around in the mud or sand, it’s a good idea to check your engine air filter afterwards and if needed, to replace it more frequently than suggested. Engine air filters are an inexpensive way to keep your engine healthy and keep you from filling up at the pump more than you need to. Some filters are considered disposable (typically made of paper), while other types can be cleaned and reused (other material blends).
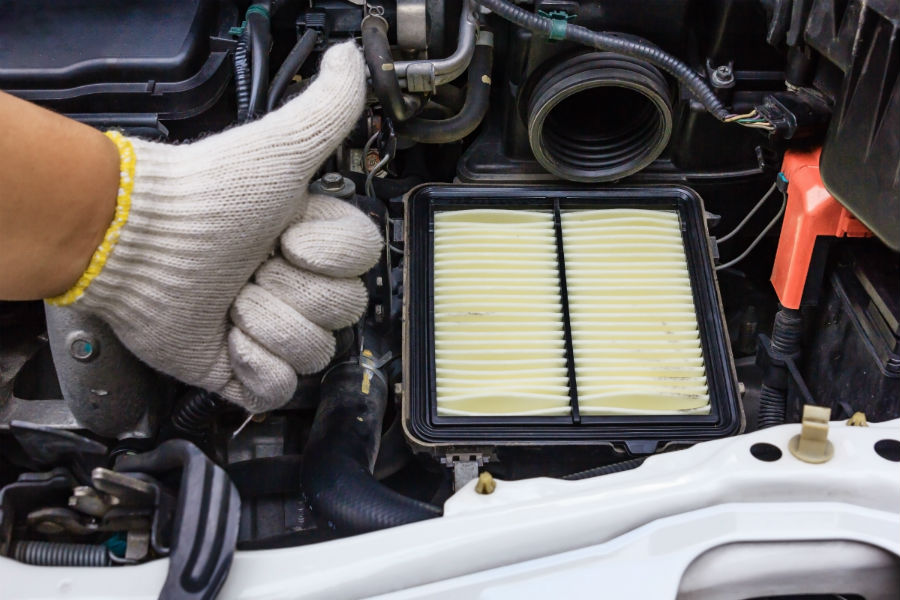
How to Inspect and Replace Your Engine Air Filter
Due to the need for regular replacement, engine air filters are usually easily accessible once you pop the hood. Some may require removing an extra part or two to access the filter, but in most cases they are located near the top of the engine and can be accessed by unhooking a latch or two with your fingers, unscrewing a couple of bolts from the outer air filter box (the protective hard plastic shell around the actual air filter), and/or carefully pulling off your plastic engine cover. Once the cover to the air filter enclosure has been removed, simply pull out the old filter (noting the orientation of how the filter is installed – take a picture if needed), inspect it for dirt and debris, and if needed, simply place the new filter in the air filter box in the same orientation. Make sure it is securely in place without any gaps or movement. Replace the cover in reverse of the method that was used to remove it, tighten up any latches or bolts and dispose of your old filter. If you start your vehicle and a check engine light comes on, something is wrong and review your steps and ensure the filter is properly seated in the air box with the correct side of the filter facing up. If you have any doubts of what you are doing, there are walk-through guides for virtually any make and model available on YouTube, or you could consult your mechanic for guidance.
Keep The Air Inside Your Car Clean & Fresh
A Cabin Air Filter is a smaller air filter that is usually located beneath or behind your glove box, or via an access panel in the engine bay (you can confirm its location in your owner’s manual or by searching online). The cabin air filter’s job is to keep the air entering the passenger compartment of your vehicle clean and fresh. When you turn on the air flow (such as AC or heat), the cabin air filter blocks pollen and pollutants from reaching your nostrils and lungs. Like any filter, cabin air filters need to be periodically checked and replaced, as noted in your vehicle’s recommended Maintenance Schedule, If things are starting to smell a little funky when the air starts blowing, or you aren’t getting the same amount of air flow that you are used to, a clogged Cabin Air Filter can be to blame. Like an engine air filter, if you’ve been driving through conditions with heavy particulates in the air (e.g. dust, pollen, smoke, debris), you may need to replace the filter more often than is recommended under ‘normal’ driving conditions. Replacing your cabin air filter is a cheap and easy fix that you can do yourself, typically requiring 10-30 minutes.
How To Change A Cabin Air Filter
The first step is to identify where the cabin air filter is located in your vehicle using your Owner’s Manual or by searching online. Often the cabin air filter is accessed underneath or behind your glovebox, or via an access panel in the engine compartment. Typically you will need to remove a handful of screws, clips and/or latches to remove the glovebox or access cover. When removing the glovebox, do so slowly and carefully, as there may be wiring harnesses that are attached and need to be disconnected before you can move the glovebox or cover completely out of the way. DO NOT pull on or force the glovebox or cover to free any wiring – you may create more headaches for yourself. Often you can find step-by-step written instructions or video guides online of the best procedures to follow for your specific vehicle. With the glovebox or access panel removed, you should be able to see the outer edge of the cabin air filter, which typically has an arrow printed on it denoting the direction of airflow. Take note of the orientation of this arrow, as you will need to install the new filter with the arrow facing the same direction. Remove the old filter, inspect it, and if needed, replace it with a new cabin air filter with the arrow pointing in the same direction as the old one. Next, follow the reverse of the steps you took to remove the glovebox or cover, being sure to reconnect any wiring harnesses that you disconnected to gain access. Sometimes a second set of hands can be helpful for holding the glovebox or cover in place while you reinstall the screws, bolts, latches or fasteners. With everything back in place, you should be ready to drive and will be enjoying fresh, clean air once again.
Easy Maintenance to Keep You and Your Car Healthy
Replacing your air filters is a great way to take your first steps of maintaining your own vehicle and can hopefully save you some money in the process. It’s easy to ignore these items and procrastinate their replacement, but staying on top of them and being aware of the conditions you have been driving through can save your car (and your own body) from developing problems or discomfort in the long run. Stay tuned for more guides to other easy DIY fixes in the future!